Fundamental Safety:
- Give your undivided attention to the caramel sauce while you are preparing it.
-Caramel is HOT! Be careful. For reference- Water boils at 212°F, we are taking this sugar mixture to 380°F, so it’s incredibly hot.
-When you add the heavy cream to the pot of molten sugar, it will bubble violently and steam will escape. Stand back and keep your face away from the pot!
-Avoid a caramel catastrophe by making sure your heavy bottomed pot is large enough. Trust me; you do not want this caramel sauce to boil over onto your stove. It will bring you to tears. When you’re done, be sure to soak your pot and tools with hot water to help the cleaning process.
-Make sure your stirring utensil is heat proof. I typically use a wooden spoon or a silicone spatula.
Yield | 1 cup
Ingredients:
1 cup sugar
1 tablespoon corn syrup
1/4 liquid cup water
1/2 liquid cup heavy cream, heated until warm
2 tablespoons unsalted butter, softened
½ teaspoon fine grain sea salt
1 teaspoon pure vanilla extract
Directions:
1. In a heavy saucepan (at least 5 cup capacity), stir together the sugar, syrup, and water until the sugar is completely moistened. Place your candy thermometer into the pot taking care that it is tip in immersed into the sugar mixture.
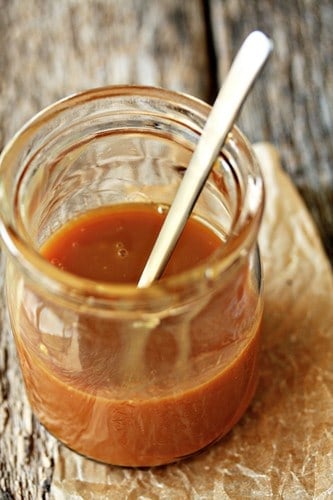
2. Heat, stirring constantly, until the sugar dissolves and the syrup is bubbling. Stop stirring completely and allow it to boil undisturbed until it turns a deep amber (like the color of Bass Ale) (380°F.). Immediately remove it from the heat and slowly and carefully pour the hot cream into the caramel. It will bubble up furiously.
3. Use a high-temperature heat-resistant rubber spatula or wooden spoon to stir the mixture until smooth, scraping up the thicker part that settles on the bottom. If any lumps develop, return the pan to the heat and stir until they dissolve. Stir in the butter and salt. The mixture will be streaky but become uniform after cooling slightly and stirring.
Allow the sauce to cool for 3 minutes. Gently stir in the vanilla extract.
Storage:
Keep at room temperature for up to 3 days; refrigerated, about 3 months. To reheat, simply place in a microwave safe container and heat for about 45-60 seconds. Stir well.
Tempting Twist:
Use fresh vanilla bean instead of vanilla extract. Simply scrape the seeds from inside ½ vanilla bean. Place the seeds and pod into the cream while it’s warming. Remove pod from the cream before adding to the hot sugar mixture.
"Today is the beginning of a new recipe series I’m dubbing Fundamentals. I get a lot of emails from new bakers asking for basic recipes, tips, and product recommendations that will get them started with their newly acquired baking addiction.
While I can’t guarantee rock star status, I can provide you with some practical tips and simple tested recipes that work for me in my kitchen. The first recipe I am going to try and demystify is caramel, more specifically homemade caramel sauce.
I have a confession. Making caramel scares me. I love caramel, whether it’s by itself, sprinkled with sea salt, covered in peanuts, enrobed with nougat…well you get point. Although my love for caramel has been present for many, many years, I just recently started to make my own.
There have been some serious failures along one of which required the disposal of a pan. Yep, I tried to clean that sucker for days, so I ended up chucking it into the trash. Bottom line, caramel is finicky, it goes from perfect to a burnt mess in the blink of eye, but when you nail it, the outcome is extraordinary. Plus, you’ll never have to buy that overly sweet jarred stuff again!"
via
mybakingaddiction.com
Fundamental Information:
-Caramel is essentially melted sugar.
-There are two basic ways to make caramel: the dry method and the wet method. The dry method involves slowly heating sugar until it melts and is deemed as a bit more difficult. The wet method is more common and is what you will find in today’s recipe.
-In the wet method, granulated sugar is dissolved in water and then boiled until the water starts to evaporate. As the water escapes, the mixture goes through a series of stages that indicates the ratio of water and sugar.
Fundamental Gear:
-heat safe spatula or wooden spoon
-heavy bottomed pot (non-stick is easier to clean)- If using non-stick, it may be difficult to know if your caramel has reached the desired shade of amber. Simply use a heat safe utensil to remove a few drops of caramel to a white plate.
-reliable candy thermometer- you will risk burning your sugar if you don’t have an absolutely accurate thermometer; cheapos from the supermarket typically don’t cut it
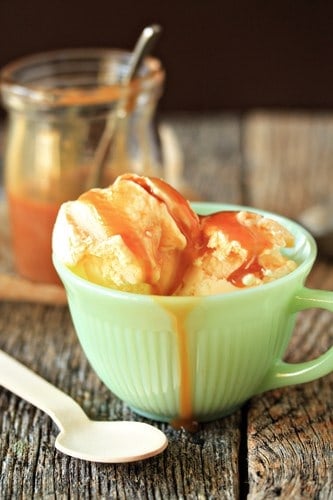
Uses for Homemade Caramel Sauce:
-eat it with a spoon
-spoon it over your favorite ice cream
-drizzle it over your favorite baked goods
-stir it into your morning latte to create a homemade caramel macchiato
-use it as a dip for fresh apple slices
-jar these up and pass along to friends and family;
(just be sure to tell them it needs to be stored in the refrigerator)